Thoughts on the new Citadel Tool Range.

99239999068_CitadelFineDetailCutters (1).jpg

I recently did a video review of the new Citadel Tool set. It's not a hard-hitting piece. Mostly first impressions, I guess. Overall I was pleased with the tools, less so with the price.

Of course, that wasn't really enough for some people. I think that they wanted me to condemn the tools outright strictly based on their price. There's at least one blog out there that does this by showing that you can save half by buying cheap tools.

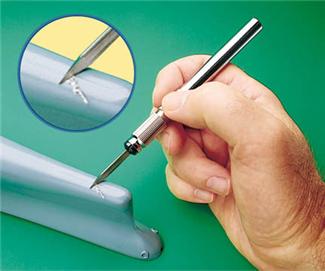
But is that a fair comparison? My impression of most of the tools is that they are built very well. The cutter in particular feels great in the hand and is really nicely designed.

Sure, there are any number of tools that you could buy to do essentially the same job and save a crap ton of money doing it. But I like to have nice tools - not just adequate tools. So what if I gave myself a budget based on the price of the Citadel tool range and got the best tools that I could get from elsewhere. What could I get?

Sprue Cutter

Okay, my budget for a cutter is $35. A quick look around at my options tell me that the Citadel cutter is indeed at the extreme high-end price for this type of tool. I see a couple of options that would do as good or better a job and still save me money. Here are my top two choices:

Xuron 2175 Professional Sprue Cutter

If you Google "Best Sprue Cutter" you'll find a ton of links to this particular cutter. It looks good, seems well made, and everybody raves about it. Based on that alone I would probably look at going with this one. Sure, it's not as burly or sexy as the Citadel version, but it looks like a solid tool.


Set of 3 Cutting Pliers

cutters.jpg

So, we've got the money. We might as well spend it. This comes closer to the $35 limit, but that's because it's not just one pair of cutters. It's 3. Each one with its own angled cutting head. An interesting idea, but I don't know that I'm going to want to spend time deciding just which angle is going to work best for a particular piece. No, I think I'll go with my first choice. Maybe I'll put the savings into one of the other tools.

Pin Vise

This is one that I want to take a close look at. I've worked with a number of pin vises over the years and the cheap one do tend to fall apart. The funny thing is that the old Citadel one has been one of the better ones I've used and the new one is probably the least impressive of the new tools. It's definitely not an improvement in anything except looks.

Tamiya 74041 Handy Drill

tamiya.jpg

This isn't a pin vise, but it should be able to replace one in many instances. I also already had this tool in mind when I started this post. I really want to get one of these so in my hypothetical shopping spree I will. This drill is actually a kit that you assemble before you get to use it.

Of course, this drill is a few dollars more than the $18.50 that I have budgeted for this tool. That's okay though because I have at least $10 left over from buying the cutter(s).

Starrett Pin Vise

So, let's say that I actually want a pin vise and not a drill. Well, I could get one of these. Starrett is a maker of finely crafted machine tools so I don't doubt that this would be a tool that would last me a lifetime. On the upside it's a couple of dollars cheaper than the Citadel version. On the downside, its chuck is a fixed size so if you need to be able to get larger bits into it then you have to buy the next size up as well. That would probably put me over budget. Still, it's a nice tool and worth considering.

Hobby Knife

I like the new Citadel knife. I'm not sure why they swtched from the #11 X-Acto-style blade to the #3 scalpel blade, but I can see one benefit in that the blade can accidentally slip free of the handle when you're doing a deep cut. I'll be honest, though. I don't see a problem with my good old-fashioned X-Acto knife. I also have about six of them so that makes me less inclined to want to buy a new one in the next decade. But for the sake of our fiction, let's take a look at what's out there.

Xacto Basic Knife Set

knifeset.jpg

Finding a way to spend $25 on a hobby knife is pretty tough unless you buy a year's supply of blades up front. This set is probably the best way to spend that money. You'll probably never use half of the stuff in the set, but any time you have a new task you can marvel over all of your blades and decide just which one you should use. And you still have your handy #11 for your routine tasks.

Retractable Scalpel

If you just want something similar to the Citadel knife, you can find retractable scalpels. This one runs for about $19. That's not too far off our budget. I'm not fond of the pastel coloring though.


Files

GW gives you two very fine diamond files in their box. I don't think that I've ever worked with files with as fine a grit as those before. I learned a lot about files looking for something to fit this $18 hole. There are a bunch of sizes, styles and grits that you can buy. So I decided to narrow it down to a set that at least included fine grit tools.

Dual Angle Sanding File Set, Multiple Grits, Set of 9

When sanding something my preference is usually to grab an emery board. I'll even cut them up if I need to get into a tight space. Well, this is essentially a set of specialized emery boards designed to get into tight spaces. You get a bunch of them in different grits for about $15. Files will last longer, but these are probably more versatile.

Seam Scraper

I've never had one of these. When I need to scrape a seam I pull out the hobby knife. That said, I think I was really surprised by how nice the new GW tool felt in my hand and I feel like I wouldn't mind giving one a try in the future. But since this shopping trip has to include non-GW tools, let's take a look at what else is out there.

Micro Mark Seam Scraper

This one looks pretty nice. Looks like it will fit in your hand like your Xacto knife and the blade appears fine enough to do small pieces. It's also adjustable. Not only that it's a couple of bucks cheaper.


Deburring Tool

Another thing that people have said that they use for this purpose is a deburring tool. This is a tool normally used for cleaning up the edges of machined metal parts. I have my doubts as to how effective these kinds of tools could be for our hobby, but if I were going to experiment I would probably get one of these sets with the various heads so that I had the best chance at being able to make it work

Sculpting Tools

This was probably the hardest category to shop for. There's an infinite number of shapes and sizes of sculpting tools out there. Many of them are just repurposed dental tools and so they all tend to look essentially the same. Expensive as they may be, I do like the set GW offers because they all seem pretty useful.

Big Honkin' Set o' Dental Tools

Well, if we're going to spend $25 we might as well just buy every frakin' dental tool style in one swell poop. The nice thing about sculpting tools is that if you're actually sculpting with them then they don't exactly need to be bullet-proof. One set is as good as another, I guess.

Squadron Products Sculpting Tool Set

This is a pretty standard set. I think that Privateer Press sells almost exactly the same set. This one goes for $14. I'm not exactly excited about it but it saves us $10. I guess with the extra money we could also get this spatula set since the sculpting set does have one.

So that about covers it. At this point I've spent most of my budget and have a nice batch of tools. be sure to let me know if I've missed a tool that I should have put on my list here.

Dropping back in to Dropzone Commander

About a year ago I discovered Dropzone Commander. I was completely enthralled with the miniatures and the look of the game. I picked up the rulebook and a starter army and I even got a commission to paint a small army. And that pretty much ended a brief but torrid love-affair.

The thing was, the miniature designs were wonderful. Looking at the resin castings you could tell that the masters were superb. Sadly, the casting was not. If you're curious, you can see the four videos that I recorded while working on this project.

Dropzone Commander Post Human Republic Army

So, what has changed? Well, a new client asked me to paint more minis from DZC. I hesitantly explained that, while I was interested, I had a bad experience and might have to charge a bit more because of the casting issues. He explained that what he really wanted was to get the miniatures from the 2 player starter set which are not resin.

So that bit of got me looking at the game again and buying a 2 player starter myself. I'm nearly finished painting my UCM forces (I actually split the box with a friend) and I look forward to trying the game again.

2013 - A Commission Painter's Year in Review

Dark Vengeance

I started this year the same way that I ended the previous year - working on a full set of Dark Vengeance minis for a regular client.

I think that the most interesting thing about the project was that I was expecting to enjoy painting the Chaos minis and be bored by the Space Marines. Turns out the opposite happened. I really loved painting those marines. Don't ask me why. I'm not really sure why I was so inspired by them.


Omega Battlemech

Next up on the list was something a little different. Counting this Omega Battlemech, I think I've painted half a dozen Battletech minis in the last 20 years. This is, by far, my favorite. This was actually painted for the designer of this particular 'mech. My friend, David White.

The mini is something of a beast. It had to be painted in pieces and then assembled, then touched up and I had at least once incident where it toppled over and came apart (it's metal so nothing broke) and had to be touched up again.

I'm super-proud of that model. It really came together well and go me working at a scale that I haven't done much recently. I think that this is also the model that solidified my approach to painting white.


Assassin

One thing that was interesting about 2014 is that there was both a lot of repetition as well as a lot of new things. In the new category was an influx of RPG minis from a variety of manufacturers. I think that the bulk came from Reaper, but a lot of different companies were represented on the list. The guy on the left is from Dark Sword minis.

I can't think of anything better than somebody handing me a batch of fantasy minis, some loose guidelines on color, and telling me to go nuts. In many ways it's the best kind of commission. I get to do a lot of different things, so I'm never bored. I have some sense of direction from the start, so I don't spend a lot of time staring at a mini wondering how to get started (you might be surprised at how long I can spend worrying about a color scheme in the absence of direction). I do some of my best work in situations like that. 


Dropzone Commander Post Human Republic Army

Every now and then I actually put the call out that there's something in particular that I want to paint. Early in 2013 I had taken a shine to Dropzone Commander. I let people know via my videos that I was interested in painting some of the minis. Sure enough, one of my clients answered the call and I got a chance to paint this set of UCM miniatures.

The minis are both amazing and frustrating. The masters must be a thing to behold because the detail on the minis is amazing. Sadly, the casting isn't all it could be and some pieces needed to be replaced, a lot of work was needed on some of the pieces that weren't replaced, and by the end I was pretty much done with the minis in terms of enthusiasm. I LOVE how they turned out. My work had not gone without reward. Still, it pointed out to me some of the issues that miniatures manufacturers are always going to have trying to crank out vast quantities of resin models. I think GW made the point pretty well on their own with Finecast, but the problems aren't limited to them. There's nothing quite like a lovingly cast resin model. It's a process that requires time and attention. When you rush it the results can be underwhelming.


Dust Tactics: Axis Medium Walker - Luther

Although this is about my commission painting, I thought I might also mention that in the past year I have been able to get some painting done for myself! I know, it seems weird, but I do still enjoy painting for myself. One of the things that I feared about doing commission work on a regular basis was that it would kill my enthusiasm for painting. That hasn't happened. In fact, I think the opposite has taken place. I'm more enthusiastic about painting than I've ever been. I also am certain that I've never been better at it than I am now.

So what have I been doing for myself? Well, I started two Warmachine armies (Cygnar and Retribution), painted several X-Wing minis, Federation Commander ships, Some Dust minis and vehicles and have ever started work on a German army for Bolt Action. Most of them are still in my collection - though I did end up selling my Cygnar models to help get another player started in the game as well as giving me an excuse to paint Retribution minis.


Emperor's Champion

This was just a one-off for a client. It's actually the second time I'd painted this particular sculpt. The first time was when it was in metal when it was first released. This was a Finecast model. I had no problems at all with the casting. I think by this time GW had managed to sort out most of the issues with that line (which is now pretty much done). I love how it turned out. Especially the black sword. I'm not ever sure what made me go with that look, but there it is. 

One thing I sometimes have trouble focusing on is my bases. This once got just a little bit of extra detail that I think really helps give the model a lot of character.


Earth Reborn

Something else new in 2013 was painting sets of boardgame minis. I have a feeling that this is going to continue to be a regular thing as boardgamers are discovering how cool it is to have a full set of painted minis for their game. It doesn't hurt that many boardgames now have miniatures that rival some of the best miniature game pieces in terms of sculpt quality if not casting material. This set of minis for the game Earth Reborn turned out pretty great, but I also did a set of minis for Fury of Dracula. The Boardgame area of my portfolio is also one of the most popular sections.


Bethsoft Doom Miniatures (Painted)

 One thing that continued from last year to this year was DOOM! Last year I painted a bunch of DOOM miniatures and this year I also painted a bunch of Doom minis. The fact that Bethesda Softworks briefly released a set of the minis for the first time in 20 years resulted in part of the resurgence in interest. The things continue to be highly collectible and the fact that my painted minis come up pretty high in Google searches means that I'm likely to continue to get inquiries about doing more of these in the future.


 A quick check of my YouTube stats shows me that my volume of videos created has dropped a bit in 2013. I did 52 videos in 2012 and 43 in 2013. To be fair to myself though, I did spend a lot more time, effort and money improving the quality of those videos. I hope to continue doing that.

As I type this my channel has nearly reached 2000 subscribers. Which means that I picked up about 1000 subscribers over the course of 2013. Being Interviewed by The Wargamers Consortium gave me a nice bump in subscribers at the beginning of the year.  My X-Wing Mini painting videos seem to have been picking up new subscribers as well.

I really do love doing the videos but there's always a tug-of-war between needing to get projects completed and wanting to do the videos. There's just no way around the fact that shooting video slows down my painting. When you get into a groove you just don't want to break it to get the camera going.  I wish doing the videos paid as well as commission work. I would switch over to just doing videos in a heartbeat if it did.


 I've been jotting down my thoughts over several days and I'm afraid that this is coming across more disjointed than I'd hoped, but in a way this is really just an exercise for me. A way that I can reflect on what I did and where I might be going which is one of those things that one is expected to do at the beginning of a new year.

FYI - If you want to see all of the commission work that I did last year (and all previous years) I keep a set of them on Flickr.

The Joy of X-Wing

When FFG first released their X-Wing miniatures games I immediately fell in love with it. It was easy to play, it had a depth that revealed itself over time, the models had amazing detail, and the paint was good enough that I didn't feel like I needed to repaint them to enjoy them.

That's right. I LIKE the fact that the minis are essentially done. It means that I can enjoy the game right away without feeling like I need to do any work before I get to that point. On the other hand, when I decide that I want one of my ships to have custom colors this isn't a problem and bringing out more of the underlying detail really makes the models shine.

I almost wish that all miniatures games were like this. Yes, I still enjoy painting miniatures but I'd rather not feel like I HAVE to paint my miniatures to enjoy the game - and I am definitely one of those people that feels strange playing with unpainted minis. I think that the Dust line of games is a really nice compromise. The minis aren't really painted, but they are started to a point that they don't feel too unfinished on the table as is (though I still prefer the finish level of the X-Wing minis.

If you've looked at my Flickr feed recently (or the Misc section of my portfolio here) you might have noticed my recent repaints of the A-Wing and HWK-290. Both were a lot of fun, but the HWK repaint really had me looking at that ship in a whole new light. I've always liked the design but I think the dark brown color really hides the detail.

I'll be doing a Slave 1 in Jango Fett colors for a client very soon and a video will follow shortly after so keep an eye out.

The Problem with Duplication

There's something cool about being known for doing a certain thing well. One of the benefits is that people come to you wanting to give you money to do that thing for them. Most of the time the request is fairly general: "I like how you painted those guys. Make them kinda like that - but, you know, just make it cool." But when it comes to my Doom miniatures clients they are a lot more exacting. 

When I painted my first set the client had very specific requests in terms of colors. It was mostly geared towards making the colors of the minis closely resemble the colors on the sprites from the original video game(s). That client was very happy with the results and the resulting photos seem to have traveled far and wide to such a point that I will have painted five or more sets of the minis by the end of the year. The interesting things is that the subsequent clients have all wanted me to duplicate the work that I did for my first client. 

In itself, this isn't really a problem. Since I have good photo reference it shouldn't be a problem to do what I did before. The fact that I made some videos on the topic make it a little easier since I have that reference. But other than the videos I don't really have any notes. My painting can be fairly spontaneous. Luckily, I tend to focus on certain colors over other colors and with the reference I can generally figure it out. When I can't, well, things don't always reproduce exactly as before.  

The other problem with trying to duplicate my previous work is that I am rarely satisfied with my previous results. If I'm just doing what I did before then I feel like I'm not moving forward with my painting. Who wants to make the same mistakes over and over on purpose? Unfortunately, when you're asked to reproduce a previous work this is probably what you're going to have to do. 

At this point I try to make adjustments where possible and hope that the clients will see it as improvements. If not... it's back to the old recipe.

Painting Marble

In 2010 I painted this Space Marine Statue from the Honored Imperium set. I decided to use it as an opportunity to experiment with marbling effects - something that I'd learned about but never really tried previously.

This week I got an e-mail asking me how I'd done it. Three and a half years later I had a hard time remembering. Luckily, I'd written my recipe down in a forum so I just needed to figure out which one. 

Since I went through all of that effort, I thought it would be worthwhile to repeat that recipe here: 


I started with black primer. Then, I took a little P3 Troll Base color mixed with Liquitex Gloss Medium and a bit of water at about 1:2 - making it a little transparent. This was applied directly to the black with a small sea sponge. I dabbed the whole thing once, let it dry a bit, dabbed in again, let it dry, and on and on until the color built up. The trick seems to be to keep the paint from smearing too much. Once the base was where I wanted it then the fun part started. That is, painting the veins of color. I added a lot of the troll belly color to the existing color to lighten it up. Then, I painted the veins in with a feather rather than a brush. Why? Because the feather will naturally move around as you paint with it keeping the cracks much more natural in appearance. I had done a Google image search to get a sense for how the veins should look so I tended to keep them flowing in the same direction - but obviously they don't all go the same way. If any of the veins looked too pronounced then I would either dab them with my finger to blend out the line or I would do it with a brush. When that was done, I went back over a few of the veins with a brush to add a bit more emphasis to them. At that point I was pretty much done... with the statue anyway. The base is pretty straight forward.

BTW - That feather technique is something that I learned about when I was a Set Painter for television. I wasn't sure it would translate to small scale, but it seems to work just fine. It did require trimming up a feather to get a useful tool out of it, though. I really need to do a video on this subject...


Getting back to basics

I recently ran across this video on YouTube. It's a nice primer on color theory and how it related to paint mixing. I was surprised at how well it covered the subject in a way that I felt really applied directly to what I do with miniature painting.

Of course, it's not that I don't know this stuff. I do. But sometimes it's nice to get a refresher on the basics. I've noticed that I sometimes get into a rut with painting where I will tend to paint certain colors in certain ways or grab from the same palette no matter what I'm painting. Sometimes going back to basics can inspire my mind to give more thought to what I'm doing before I do it. 

On the other hand, keeping this information at the top of your mind will help when you're stuck thinking about the best way to highlight or shade something. This is especially true when you don't have just the right pre-mixed shade that you're looking for and you aren't quite sure what the best way to mix what you want would be. 

I have a lot of books and magazines on painting and modeling. They are great to break out and look through every now and again to get the old creativity brain cells firing again. You can always pull out some new technique that you had read about before, but it had never been relevant to you previously. Of course, these days YouTube tends to fill this niche for me more often. I have many good painters on modelers on my subscription list. Even if I'm not actively paying attention to them as I paint it's nice to have that running commentary going on in the background for my mind to sift through as I'm working on a project.

If there's a point to this all, it's that it's good to keep learning as well as re-learning. You never know what bit of information is going to be helpful on your projects. 


Selling my Still Camera

Hey, everybody! 

I've got my Nikon D300 on eBay right now. I'm selling what has been my favorite camera ever in order to upgrade to a camera that includes video capabilities - and so increase the quality level of my YouTube videos. 

Want to see the camera (and perhaps bid on it)? Then head over to eBay and have a look. 

A new website!

If you've been here in the past then you're probably already noticing that things are a bit different around here. 

I recently decided to move from my Drupal site to one created via Squarespace. The Drupal site was fun when I was still into doing website development. Back then I didn't mind spending hours on the guts of the site to get it to do what I wanted it to do. These days I'm much more visually oriented and just feel like I don't enjoy that back-end work anymore. 

A couple of years ago I dabbled with Squarespace. While I liked the concept of it, I felt like it wasn't QUITE there yet. It was pretty fiddly overall and I felt like I was going to need to learn a whole new vocabulary of web design to create something with a tool that was supposed to make the process easier. Now... well, now it's pretty nice. I was able to put this site together in a few hours over a few days. It felt like very little work and the result was really clean and functional. I still feel like I can continue to play with it over time to keep personalizing it and making it exactly what I want - but I can do it on my terms over a longer period without feeling like the site is broken until I get that done. 

So, I hope you enjoy the new site. Perhaps it will encourage me to actually add more blog-postings instead of spending all of my time doing YouTube videos. 

Review: Liquitex Airbrush Effects Medium


For most of the time that I've used an airbrush I've opted to use water, window cleaner, alcohol or other similar household things to thin my airbrush paints. When Games Workshop first released their Lahmian Medium I started experimenting with using that as an airbrush thinner and was pretty happy with the overall results. Of course, the real downside to using GW's medium is that it's pretty expensive if you're going to use it a lot. Add to that the fact that if you try to use any of their shades over an airbrushed coat of paint that uses this medium can create problems... well, I knew it was time to experiment with something else.

That brings us to Liquitex's Acrylic Airbrush Medium . I bought a bottle of this as my next experiment because I've been using some of their other mediums for a while and this seemed like a natural next step. So far, so good.

The consistency of this medium is like that of thin milk (and it even has a milky coloration). When mixed with paint it thins it nicely and it helps the paint maintain its cohesion no matter how little of the paint you decide to add. This means that you can use it to create very thin color layers and not worry about the spray just beading up on your model like you might when you use water. The medium says that it is not matte or gloss, but I have found that it will tend to give flat paints a little more of a semi-gloss finish. I don't think that it's something that the medium adds, but because the surface becomes so smooth that it can't help but be glossier.

Interestingly, paint thinned with the airbrush medium can still be brush painted to good effect. After mixing up a batch of red for the airbrush I had a bit left over in my thinning cup. Since I needed to go over some areas to bring color up a little more I used a brush and my leftovers. The results were surprising. Obviously, since the paint had been thinned substantially the coverage wasn't as dense as the unthinned paint - but you could slowly build up the color by layering these thinned coats and get a nice, smooth finish. Pigment dispersion is very uniform so you don't get much in the way of streaks or brush strokes when brushing the paint in this way. I haven't yet tried creating washes with this medium (since the Lahmian Medium works so well for that purpose) but I will definitely be experimenting with that in the future.

If there's a downside to using this medium it's in the bottle. It comes in large quantities and the cap/dispenser isn't well suited to doling out small amounts of medium. This has meant that there tends to be a little puddle of medium beneath my bottle when I'm using it a lot. I might need to find a small dispenser bottle to transfer small amounts to for day-to-day use.